
Quote of the Day
Wealth, like happiness, can never be attained when sought after directly. It comes as a by-product of providing a useful service.
— Henry Ford
Introduction

Figure 1: My Crude Stair Model.
Almost exactly six years ago, I wrote a post on a carpentry hack that resolved a problem I had with a stairway after a contractor installed an insulated floor in my basement. The insulated floor raised the floor level and made the bottom step of my stairs short – a violation of the code. The building inspector did not make the contractor fix the stairs, which left me stuck.
Since I had carpet installers coming in the next day and it was late at night, I decided to shim the stairs to make all the risers equal height (see Figure 1). The original post addressed how I computed the thickness of the shims used. I recently have had questions from readers who have encountered every possible floor height change:
- Lower floor height raising or lowering
- Upper floor height raising or lowering
- Both the upper and lower floors changing

Figure 2: Stringer Illustration. (Source)
In this post, I will show how to generalize my previous stair solution to handle these three cases. I also present some illustrations of what is involved in adjusting the stairs. The general solution used a Mathcad program to compute both the final riser height and the thickness of the shims or trim cuts required for each step. In general, you may need a combination of shims and trim cuts to resolve a riser height problem caused by changes in flooring height.
Because trim cuts on existing stringers (Figure 1) are difficult, I normally would just cut new stringers – I shimmed in this case because no trim cuts were needed, no stringer material material was available, and there was no time. The solution in my case was quick, cheap, and has worked well for the last six years – your case may be different.
My Mathcad source and its PDF are here for those who are interested.
Background
Definitions
- shim
- A thin often tapered piece of material (as wood, metal, or stone) used to fill in space between things (as for support, leveling, or adjustment of fit). (Source)
- trimming
- The act of making small cuts in material to provide space for fitting things together. If I had to trim a stringer, I probably would use a small circular saw to cut the straight sections and an oscillating saw for the corners. (Source: me)
Lower Floor Level Change
Equation 1 provides a formula for computing the thickness of shims (positive values) or trims (negative values) that must be done to each step in order to equalize each step after the level of the floor has changed.
| Eq. 1 |  |
where
- τi is the shim (positive) or trimming (negative) thickness required for the ith riser. I count the steps from the bottom to the top.
- τ0 is the thickness added (positive) or subtracted (negative) from the lower floor level.
- N is the number of steps.
Upper Floor Level Change
Equation 2 provides a formula for computing the thickness of shims (positive values) or trims (negative values) that must be done to each step in order to equalize each step after the level of the floor has changed.
| Eq. 2 | 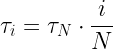 |
where
- τN is the thickness added (positive) or subtracted (negative) from the upper floor level.
Combined Upper and Lower Floor Level Change
To solve this case, I just apply Equation 1 followed by Equation 2.
Analysis
Conventions
In each example, I show the Mathcad formula and its output (a nested array): (1) the first element of the array shows the new rise value; (2) the second value is the array of shim/trim values. I always treat the lower floor height change as the zeroth element of the shim/trim array and the upper floor height change as the Nth element of the shim/trim array.
Lower Floor Raised Example
Figure 3 illustrates the only case that I have dealt with directly. I had an insulated floor installed in my basement and it raised my lower floor level – I color in blue the positive level changes (i.e. shims).

Figure 3: Lower Floor Raised Example.
Lower Floor Lowered Example
Figure 4 illustrates a situation that a reader recently presented me. He actually lowered his lower floor level – I color in yellow the negative level changes (i.e. trimming). The example shows my risers before and after trimming.

Figure 4: Lower Floor Lowered Example.
Upper Floor Raised Example
Figure 5 illustrates the case where I the upper floor has increased in height.

Figure 5: Upper Floor Raised Example.
Upper Floor Raised/Lower Floor Lowered Example
Figure 6 illustrates the case where the upper floor raised and the lower floor dropped. This case requires both shims and cuts. In this case, I would strongly consider cutting new stringers because all this shimming and trimming looks like work.

Figure 6: Upper Floor Raised, Lower Floor Lowered.
Conclusion
I hope this example helps those who are trying to shim their stairs under general circumstances. If I have time, I will try to come up with a good Excel solution to this problem.
Very nice! An Excel solution would be a welcome addition. Thanks much.
I don't know why I didn't think of that. Thanks for mentioning it. I will add that.
mark