
Quote of the Day
Are all your ideas this f**king stupid or is this one exceptional?
— Software engineer in a meeting

Figure 1: Promo For Western Minnesota Steam Threshers Reunion.
I was just at the Western Minnesota Steam Threshers Reunion (Figure 1), which is celebration of old-school steam technology. As always, it was a great show. The name of the reunion is a bit of a misnomer in that the show includes all forms of steam-driven gear, including the belt-driven accessories. I recall much of this gear from my youth working on farms − everything on the farm was powered from a belt connected to the Power Take-Off (PTO) of a tractor. While I am too young to have seen steam being used for real work, I saw plenty of internal-combustion tractors driving the same belt-driven equipment as the old steam gear did. The small sawmills in particular reminded me of working with my father on milling trees harvested from the family farmstead (Figure 2). Those are very fond memories.

Figure 2: Tractor PTO-Driven Saw Mill Just Like In My Youth. The only difference is with the tractor -- my family used International Harvester.
While at the show, I had numerous discussions with the folks there about how the old-timers did things. We discussed all areas of traditional technologies and one woodworking question we discussed in detail was how to determine the radii of the circles and cylinders. I thought it was worthwhile writing down the four methods that I know of. The only really unusual one is the last one listed. I had observed a person using this method to measure the inside radius of a barrel and I thought it was interesting.
Here is my list:
- Pick a point and determine the longest chord
A diameter is the longest chord you can have in a circle. If you pick a point on a circle and measure the longest chord you can find on the circle, that will be a diameter. The radius of the circle will be half of that diameter. I probably use this method the most, but it is the least accurate. Most of the time, I do not need great accuracy. This approach is easy to use if you have access to the entire circle you are measuring. - Inscribed/Circumscribed 90° angle
This method is based on Thales theorem, which states that any diameter of a circle subtends a right angle to any point on the circle. If I draw a 90° angle within my circle of interest, then chord marked by where the legs of the 90° angle intercept the circle are points on a diameter. Again, half the length of this diameter is the radius (see Figure 3).
Figure 3: Diameter Subtending a 90° Angle.
There are mechanical tools based on this approach. Figure 4 shows a picture of a combination square with center finder, which uses a circumscribed 90° angle to perform the same task.

Figure 4(a): Combination Square with Center Finder.

Figure 4(b): Combination Square with Center Finder.
I have one of these combination squares with center finder and I do use it quite a bit. Both the inscribed and circumscribed right angles work well when you have a small circle and you have access to the whole circle.
- Chord Length/Height
This method makes a lot of sense when you are trying to measure the circle radius and you only have an arc available, like for the arch and door shown in Figure 2. In woodworking, this situation is seen with arches such as shown in Figure 5.
Figure 5(a): Arch in a Home.

Figure 5(b): Door with Arch.
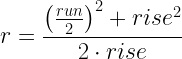
I have seen this method mentioned by a number of sources (example). You must measure the rise and run illustrated in Figure 6, then apply Equation 1. I have used Equation 1 for my home projects and it works well.
Eq. 1 where
- rise the length from the chord to the highest point of the arc.
- run is the length of the chord of the arc.
- r is the radius of the circle that will produce this arc.
For a derivation of this equation, go here.

Figure 6: Simple Method for Measuring the Radius of an Arc.
- Compass/Divider Method
I saw this approach being used to measure the inside diameter of a barrel recently and I was reminded of when I had seen it used earlier. This method works well when you really cannot get an accurate measurement using a rectangular ruler because the end of the ruler will not fit tight against the inside of the barrel. I first saw it used on the PBS program "The Woodwright's Shop" -- I do not remember the episode. The method is based on the fact that the radius of a circle is equal to the length of the side of a regular hexagon inscribed within that circle. You can illustrate this fact as shown in Figure 7 (source).
Figure 7: Regular Hexagon Inscribed Inside of a Circle.
You can iteratively determine the radius of a circle by taking a compass and divider and, by trial and error, determine the length of a hexagon side that will exactly step around the circumference of a circle. On the Woodwright show, the demonstrator commented that you can get an accurate radius using three iterations around the circumference. He looked like he did this sort of thing all the time − he may have been a cooper.
I did find a Youtube video (not the Woodwright's Shop) that does show a cooper using this method to measure the radius of a barrel at about 9:00 minutes into the video.


Appendix A: Derivation of Equation 1
The derivation is straightforward geometry (i.e. Pythagorean Theorem) and is illustrated by Figure 8.

Figure 8: Derivation of Equation 1.
Pingback: Drawing a Perpedicular Out in the Wild | Math Encounters Blog
Excellent article. I’m a big fan of how the old timers did things in the wood shops or on construction sites. Are you aware of any similar technique to determine the diameter required to produce a particular circumference? I saw a tool on a tv show that supposedly was used to measure lengths of logs. It was a wheel with a tooth that came around every foot and left a little mark. I’m curious as how they might have determined the required diameter of the round to start with. Thanks.